Gimp and Inkscape integration example
I'm noticing that there is not too many examples of possible workflows that include the collaboration between Gimp and Inkscape, and although I'm not too experienced with both programs I came with the following tutorial, maybe somebody can found it useful.
The other day I was thinking in a possible layout and xhtml structure for a project about LMS (Learning Management Systems), so I decided it to do it in Inkscape (FIGURE 1).
FIGURE 1 XHTML Structure done in Inkscape
Like you see the drawing itself is pretty simple and easy to achieve. Just remember to use the option "Snap nodes to grid" and other snapping options within File > Document Properties.
Now enters Gimp!, select the SVG file made with Inkscape and right clic over the file and select "Edit with the Gimp". A new dialog appears, check "Import paths" and then Ok (FIGURE 2).

FIGURE 2 Importing Inkscape SVG file
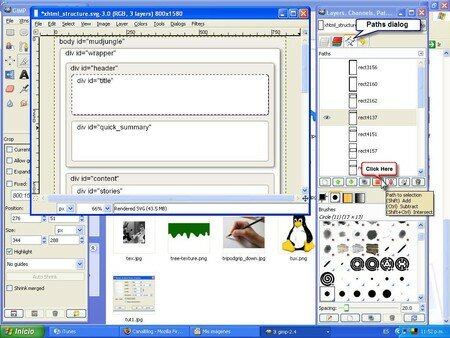
Now go to the paths dialog and select the path layer that you want to apply a effect, also don't forget to visualize (check that the eye icon appears) the layer. Then clic the button Path to selection. After that the xhtml container will be selected (the ants appear... FIGURE 3). Now is the time to apply the effect or filter, so go to Filters > Light and Shadow > Drop Shadow...
FIGURE 3 Selecting paths
In the dialog, select 40-50 for opacity, 4-6 for Offset in both X,Y and a blur radius of 16-20. Remember to Select > None, so you can apply the same effect to other containers.
So finally after apply the same effect to all the containers, we have a xhtml structure that is not only meaningful but visually comprehensive to start with (FIGURE 4).
FIGURE 4 Final result
Thanks
* download source SVG File: xhtml_structure


/https%3A%2F%2Fstorage.canalblog.com%2F72%2F48%2F388561%2F52220951_o.jpg)
/http%3A%2F%2Ffarm3.static.flickr.com%2F2702%2F4299690854_4a0b05de8f_m.jpg)
/https%3A%2F%2Fstorage.canalblog.com%2F99%2F61%2F388561%2F47238759_o.png)
/https%3A%2F%2Fstorage.canalblog.com%2F92%2F09%2F388561%2F42595048_o.jpg)