

Henry the Tiger
Hi!
I'm sorry because, I've not been able to write that often here in my blog, besides I'm not that creative to write new things and tutorials that often, but that is another story :)
Let me tell you a little bit, of how I've been doing in the last months...Finally I ended one big project that was assigned to me in my job, and so far I learned a lot of things related to training course design, including: recording audio, recording videos, and what I like the most... preparing custom graphics for the courses. At the end, I think the courses were fairly well :) It's worth mentioning that I used mostly open source technologies like Audacity, Avidemux, Blender, GIMP, and Inkscape. The tips I learned I will try to post them here, so you can learn a little bit too.
Ok, lets go with the main topic of this post, the latest of my characters... Henry the Tiger!!
First like all of my characters, I started to draw him in a piece of paper (sketch pad) using my favorite blue pencils (HB, 2B, and 5B). Here is my first attempt: (FIGURE 1)
FIGURE 1 My first attempt of Henry.
By the way for inspiration purposes I used a photography of a teenager rock singer to help me draw Henry, and because of that I think my first attempt was too realistic, its like a guy wearing a tiger's costume.
I decided to try again and give Henry a more cartoonish look. I also tried to make the original drawing more simple, just in case one day I animate him. So my second and last attempt its like this: (FIGURE 2)
FIGURE 2 The latest version of Henry.
Ok, so far this is not different of what I've done in the past, except that my drawings now have more contrast (thanks to Rore). So I decided to try something different and paint my character using GIMP!! (FIGURE 3)
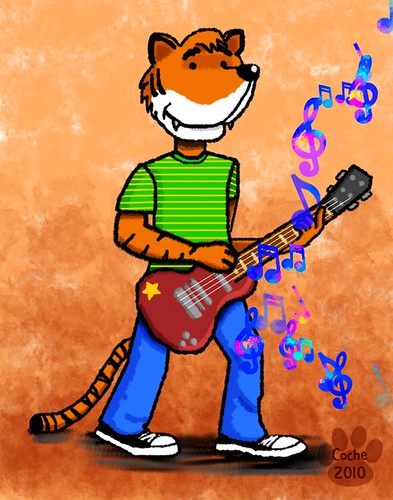
FIGURE 3 Henry the Tiger at full color :)
So far I liked a lot the experience of fully painting a character using GIMP, is not without trouble, because drawing and painting with the mouse is a pain (hopefully one day I'll have a Wacom tablet :) but I enjoyed very much. Let me share some tips of how I painted Henry:
- I started scanning my drawing (well, really I just took a pic, because I don't have a scanner) and then I imported the JPEG into GIMP.
- I used a lot of layers. At first I don't think I'll use that much layers, but as I advanced in the painting, I realized that using layers will help me in the long term, e.g. I painted the arm skin in one layer, then the stroke of the arm in another layer, and finally maybe the tiger's stripes in another layer :)
- I used layer modes (blending modes) to add the shading, and the highlights. I found particularly useful the Multiply, Subtract, and Screen layer modes. Using layer modes also helps to paint without worrying about painting outside the stroke or contour of the shape.
- Brown color (or sienna), just like in real painting can be very useful to achieve shadings and mixing colors (see previous item)
- I used some cool brushes (see http://vaults.atomicmonstergirls.net/useful/cornucopia/program-gimp/brushes/)
It's not over yet... :D like I promised in my previous post, here are my first set of brushes, I hope you like it and find them useful.
Coche's Brushes (compressed with 7-Zip)


/http%3A%2F%2Fstorage.canalblog.com%2F22%2F83%2F388561%2F36406322_o.jpg)
/http%3A%2F%2Fstorage.canalblog.com%2F99%2F61%2F388561%2F47238759_o.png)
/http%3A%2F%2Fstorage.canalblog.com%2F92%2F09%2F388561%2F42595048_o.jpg)
/http%3A%2F%2Ffarm4.static.flickr.com%2F3393%2F3670028432_05bdb446c5.jpg)